Sometimes the marketing department goes a little too far. Most of us who work in security have been there, non-technical people enthusiastic about selling the technical features of your product or service sometimes need to be reigned in. This is the natural order of things and when the balance is disturbed, we end up with FUD:
The video is full of not-so-subtle hints that HP’s printers are secure and buying a non-HP printer is bordering on criminally negligent. For example, the opening sequence, white text on black background states “There are hundreds of millions of business printers in the world. Less than 2% of them are secure”. From here, the “Wolf” executes a series of unlikely attacks that leverage the insecure printers to own the companies network and sensitive data, with the obvious implication being that HP printers would not be vulnerable to these attacks.
While the “Printer Hacking Wiki” and associated PRET toolkit are great resources, it appears that no one has taken a deep dive into the security of modern HP business printers to validate these claims.
So, we went out and bought a couple of printers, the MFP-586 and the M553. As HP’s Wolf says, “time to eat”.
UPDATE: Note that the remote code execution vulnerability described in this post was reported to HP on August 21st, 2017. HP notified us that a fix has been developed and has published a security bulletin https://support.hp.com/nz-en/document/c05839270
Table of Contents
Since this is going to be a lengthy post and many people may want to skip right to the technical content, here is a ToC:
- Printer Attack Vectors
- Testing Common Printer Vulnerabilities
- Insecure Default Settings
- Digging Deeper – Extraction of the OS and Firmware
- Firmware and HP Software “Solution” Reversing
- Reverse Engineering Firmware Signature Validation
- Constructing a Malicious Solution
- Gaining Arbitrary Code Execution
- Future Work
We are also releasing all of the code associated with this post on GitHub at https://github.com/foxglovesec/HPwn.
Printer Attack Vectors
In the video (and its sequel), “The Wolf” executes a series of unlikely attacks. Let’s ignore the fact that this attack path makes no sense and is extremely unrealistic. The following are the relevant printer security issues:
- Print Job Security – Print jobs can be exposed primarily in two ways. Completed jobs can be left on the print tray and physically picked up by someone passing by. On some printers, an attacker can extract or intercept print jobs from the printer over the network.
- Unsigned Code Execution – Printers are typically exempt from many types of monitoring performed on endpoints. If an attacker could run malware on a printer, it would provide a safe haven in the network where they are unlikely to be discovered in addition to unfettered access to print jobs.
In the following sections of this post, we’ll highlight a whole slew of security issues that were tested against two modern HP printers with the above two attack vectors in mind.
Testing Common Printer Vulnerabilities
We began by reviewing existing work in the printer security space. During this process, we discovered the “Printer Exploitation Toolkit” – PRET. This toolkit contains a number of pre-defined attack methods that can be launched against printers from various manufacturers. The toolkit provides more of a template for common attacks rather than specific vulnerabilities that will work on specific model printers, so some investigation was required to discover which issues, if any that the HP printers would be vulnerable to.
The following issues were discovered by using the PRET toolkit:
Path Traversal – Remote Stored Print Job Leakage
The PRET toolkit operates in three modes, each mode specifies the “language” by which the toolkit will attempt to communicate with the printer. These modes are Printer Job Language (PJL), PostScript (PS), and PCL. Each of these modes has a different set of common vulnerabilities associated with it, with some issues common to multiple modes.
PJL is a language that computers will speak with the printer when submitting print jobs. This language has also been extended to have the ability of performing some administrative tasks. One of the capabilities of PJL is very limited management of files on the printer. For example, it is possible to store and delete files, but only in a very specific location, a small “jail” on the filesystem that it should not be possible for a user speaking PJL to escape from:
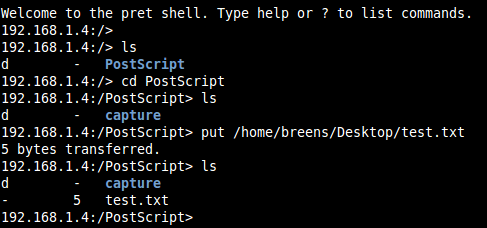
Notice in the above screenshot that when we list the files in the directory “/”, the root, we only see the “PostScript” directory.
A common vulnerability here is known as “path traversal”, it involves requesting specially manipulated file and directory names to try and escape from this “jail”. We found a path traversal sequence that worked on both HP printers as shown below:
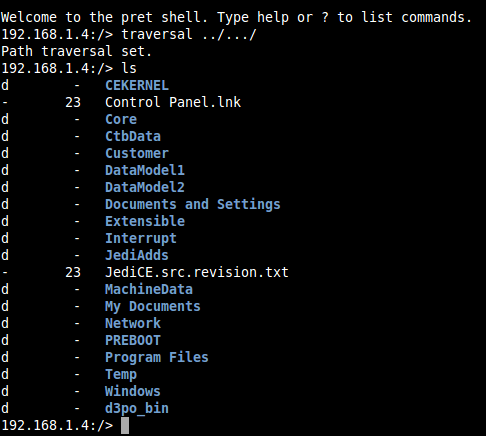
Unfortunately, it was not possible to retrieve file contents from this point or write any files, any attempts would cause the printer to crash and reboot.
Upon further investigation, we found that it was possible to retrieve file contents but only under a certain path and with a slightly modified path traversal sequence:
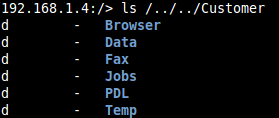
The “Jobs” directory here is where print jobs are stored. It was possible to retrieve the content of any job stored on the printer through PRET as follows:
This was tested against “PIN protected” jobs and unsecured jobs with the same result, making PIN protected print jobs a much less enticing security feature.
PostScript Job Manipulation
Some types of print jobs can be automatically manipulated before being printed. For example, it is possible for anyone on the network to place arbitrary images and font onto the pages of all print jobs as shown below where the watermark “FOO” was not part of the original document to be printed:


Unsecured Factory Reset Functionality
The PRET toolkit contains two seemingly undocumented, or at least non-obvious, methods to reset HP printers to factory default settings, thereby resetting the “Administrator” password to the default of no password. It is possible to accomplish this through the PJL interface and also through SNMP which are both by default left unsecured, even in cases where an administrative password has been set on the device:

In addition to this, even in cases where the PJL and SNMP interfaces have been secured by a diligent administrator, it is possible to reset the SNMP community string back to the default of “public”! This can be accomplished by using a lesser-known but enabled by default HP feature that allows the printer to be re-configured at boot time by the DHCP or BOOTP server.
Every time the printer boots up, when it gets an IP address from the DHCP server, it will also look for some special configuration options in the DHCP response. One of these options specifies a TFTP server where it the printer can retrieve a configuration file that will apply various configuration settings. In the detailed instruction manual for these devices, HP correctly states that any manual configuration settings take precedence over settings configured by DHCP. However, there are some options in the DHCP configuration that allow you to clear a setting that has been manually configured, including the following:
- security-reset – Reset security settings on the print server to factory default values.
- cold-reset – Reset to TCP/IP factory default settings after a cold reset
The DHCP server configuration file to enable these options will be published with the project code on GitHub.
Insecure Default Settings
Motivated by the results in the previous section, we looked to find out if there was any combination of security settings that could be applied to the printer that would stop the attacks above; specifically, what would a diligent administrator need to do in order that any user on the network could not reset the “Administrator” password.
What was found is that it is possible, however unlikely that an administrator in a real-world environment would successfully lock down the administrative interface for these printers. At least the following settings would need to be changed from their default values, and note that there is no indication to the user that some of these settings have any relevance to security. The full path in the administrative menu will be shown in order to demonstrate how far deep some of these settings are buried in the printer:
- A password must be set on administrative web interface for the device. This is common practice in IT and the only setting likely to be applied in the real world.
- Under “Networking > Security > Mgmt. Protocols > SNMP” the “Set Community Name” needs to be changed from the default of “public”
- Under “Security > PJL Security > Password”, a new password must be set
- The following setting must be disabled: “Networking > Other Settings > Misc Settings > Enabled Features > TFTP Configuration File”
If any of the above are neglected, it will be possible for an attacker on the network to reset the device and therefore gain administrative access.
Digging Deeper – Extraction of the OS and Firmware
With a couple thousand dollars dropped on printers, we weren’t going to stop until we had remote code execution (RCE). The first step was to get our hands on the code that actually runs on the printer to start reversing. It appears that HP has taken some measures to prevent users from extracting the OS and firmware from their printers, however we were able to bypass these controls.
First, HP ships their devices with FIPS compliant encrypted harddrives. When one of these special drives is inserted, all data on the drive is encrypted and if that drive is removed from the printer the data is unreadable to anyone without the encryption key. Furthermore, even if we were able to set or recover this key, the details of the encryption being used are unclear and would need to be discovered before data could be read from the drive.
Instead, we simply removed the FIPS capable drive provided by HP and inserted a regular Toshiba laptop harddrive that did not support encryption:
After rebooting the device, we were able to get the printer to install the OS and firmware from a USB key onto the new, unencrypted drive:
Turning off the printer removing the drive, it was then possible to read many of the files from the drive onto a standard PC. Unfortunately, some of the more interesting files remained elusive, specifically the HP DLL files under the “/Windows/” and “/Core/bin” directories. We knew that these files existed because we could see them in PRET using our path traversal vulnerability:


Unfortunately, when the drive was plugged into the PC, we did not see these directories. After much investigation, two different approaches were applied to retrieve the files from these two sources.
Retrieving the Contents of /Windows/
First, the Windows directory. The linux utility “grep” was used to search for references to various files that we knew existed in the Windows directory:

The file “NK.bin” seemed to be returned every time. After some investigation, it was found that the operating system running on the printer is a version of Windows CE, the Windows CE kernel is stored in /CEKERNEL/NK.bin. We can use publicly available tools (Nkbintools) to extract the contents of this Windows CE kernel and retrieve the exact contents of the Windows directory:
Retrieving the Contents of /Core/bin
Unfortunately, the contents of the /Core/bin directory were more difficult. When the harddrive was connected to the PC, the /Core/bin directory was actually visible, unlike the /Windows/ directory, however it was simply empty:
After some failed attempts at figuring out why this directory appeared empty when we knew it in fact was not, a different approach was taken.
First, we examined the partition associated with /Core/ on the harddisk:

The next step was to take an image of this partition using the Linux “dd” utility. This utility disregards the filesystem completely and takes a raw image of the partition, saving it to a local file:

Finally, a technique called “file carving” was applied. This technique is normally used in data recovery scenarios where a harddrive has partially failed or the file system has become corrupt. The tool we used is called “scalpel” and we specified a configuration file that would have it “carve” out any suspected DLL files it could find in the raw disk image, “image.bin”. The result was hundreds of DLL files, many of which were invalid, and all had a number rather than a file name:

Since we were most interested in .NET DLL’s, it was possible to use the tool “monodis” to try and disassemble each DLL and only print the list of valid DLL files and their names. While the output of the script is messy, it was sufficient to confirm that we had extracted the DLL files we were looking for:

Firmware and HP Software “Solution” Reversing
With access to the code running on the device, we could begin taking a closer look at some of the features in the printer that we believed may lead to remote code execution, specifically the functions related to the installation of HP Software “Solutions” and firmware updates.
HP Software Solutions leverage HP’s OXP platform and SDK to extend the functionality of the printer. Third party companies can develop these solutions, however access to the SDK for doing so is tightly controlled by HP, and the final version of any software developed with the SDK must be signed by HP before it can be installed on any printers. If a way around these controls could be discovered, it would be possible to create malicious solutions that would run on all modern HP printers.
Malicious Firmware updates have been a method of gaining code execution on printers from various manufacturers in the past. HP has moved to a new platform and file format for firmware updates and it appears no security researchers have examined it yet in detail.
BDL Format Reverse Engineering
Both HP Solutions and firmware updates consist of a single file with a “.BDL” (bundle) extension. This is a proprietary binary format with no publicly available documentation. We decided that reverse engineering this file format would be beneficial, as it would allow us to gain insight into exactly what firmware updates and software solutions are composed of.
Since firmware files are large and complex, for simplicity sake, we began by obtaining a copy of a 3rd party software solution called “ThinPrint”. The “BDL” file for this solution weighed in at 2.1MB in comparison to the 81MB firmware update file.
To begin, we used a tool called binwalk on the BDL file, binwalk examines a binary file and attempts to extract any known file formats contained within it. It was specifically created for reverse engineering these types of packages. The tool output a single ZIP file containing the following:
We manually examined the zip file and the BDL file in a hex editor to determine where within the BDL file that the ZIP file was located:
Notice in the above two screenshots that we have calculated the “CRC-32” checksum of a selected portion of the data in the hex editor. In the first case, with the ZIP file, the CRC-32 checksum was calculated over the entire file. In the second case, with the BDL file, the CRC-32 was calculated over the portion that we suspected contained the zip file (based on the first few bytes matching). This suspicion was confirmed when the CRC-32 checksums both came out to the same value of “6D AC 9A 2F”.
Consider also the portion of the hex editor circled in red above. Notice the value circled “2F 9A AC 6D” occurs just before the beginning of the ZIP file is simply the CRC-32 checksum of the ZIP file with the bytes in reverse order.
Seeing this, we made a small modification to the zip file (simply modified the content of one of the files), calculated the CRC-32 checksum of the modified ZIP and replaced the ZIP file inside the BDL with the newly modified ZIP file. The CRC-32 checksum inside the BDL file was updated to match the newly modified ZIP file, and the BDL file was then uploaded to the printer.
Unfortunately, this did not work, the following error was displayed:
Further investigation uncovered the following in the printer’s debug log file:
It became apparent that there existed additional CRC checksums which were corrupted when the ZIP file was replaced. After additional investigation, including writing custom python scripts to identify CRC-32 checksums in the file, the following fields were deduced in the ThinPrint BDL file:
- 0x14-0x17 = CRC32 of 0x929 to 0x938 (IPKG header)
- 0x931-0x934 = Length of IPKG structure
- 0x94d-0x950 = CRC32 of 0xd76 to 0xe89 (ZIP header)
- 0x929-0x92a = Distance of IPKG structure from the start of the BDL file
- 0xe76-0xe77 = Distance of ZIP from IPKG header
- 0xe7e-0xe81 = Length of ZIP file
- 0xe86-0xe89 = CRC32 of 0xe8b-EOF (ZIP file binary)
Knowledge of the above proved to be insufficient – updating all of the above listed checksums and lengths still resulted in some sort of checksum failure when the BDL file was uploaded to the printer.
At this point, we decided to take an alternate path. In theory, it is possible to construct a modified ZIP file with the same length and same CRC-32 checksum as the original. If this were accomplished, it would be unnecessary to update any of the fields in the BDL file!
We wrote a custom tool in Python to accomplish this which is included in the GitHub repository. The tool allows for modification of an original BDL file by replacing the ZIP file contained in it with one of the same length and CRC-32 checksum, but arbitrarily different contents. The tool was a bit of a hack and may only work with the ThinPrint BDL.
A BDL file modified in this way was uploaded to the printer and confirmed working, however no malicious changes to code could be implemented just yet. When we tried to replace any of the DLL files in the ZIP we began getting DLL signature validation errors.
Reverse Engineering Firmware Signature Validation
Once a general understanding of how BDL files worked was obtained, we began by examining the firmware update process and the security controls in place around it. First, we simply examined a firmware update file from HP in a hex editor. The filetype associated with HP firmware updates is “.BDL”. It was noted that at the end of the file, there exists a signature block:
This signature block was not present in the “ThinPrint” solution BDL, indicating that software Solution packages and firmware may be processed differently.
Judging by the information in the signature block, it appears that industry standard signature validation of the file is in use, specifically RSA with SHA256. However, just because secure cryptographic algorithms are in use does not mean that the file is being securely validated. A number of common implementation errors can render the signature validation insecure.
In order to find out where in the code signature verification was being performed, a carefully manipulated firmware file was uploaded to the device, being careful not to invalidate any of the checksums or lengths in a similar manner to the way the ThinPrint solution was manipulated. Doing this yielded the following error from the printer’s debug log:

Looking through our decompiled code that was extracted from the printer, it was determined that this message was generated in the class file HP.Mfp.Services.Installation.Fim.Fim:
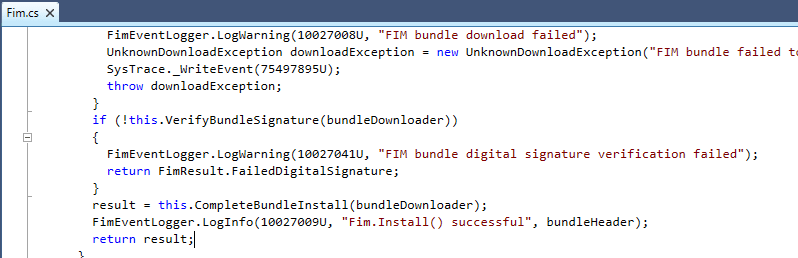
Further reverse engineering led us to the location where the signature validation was being performed. After a quick code review, no serious errors were discovered that would allow one to bypass or manipulate the firmware signature validation :'(.
Reverse Engineering HP Solution Package’s DLL Signature Validation
Since we had already partially reverse engineered the BDL format, the obvious first step in trying to execute malicious code on the printer was to replace one of the DLL files packaged in the BDL with a modified DLL file. This failed with the following error from the printers debug log:

This detailed error message pointed us directly to the location in the code where signature validation was being performed, “HP.ExtLib.Package.Process”:

Diving a little deeper, we examined the code under “signedObject.ValidatePeSignature”:
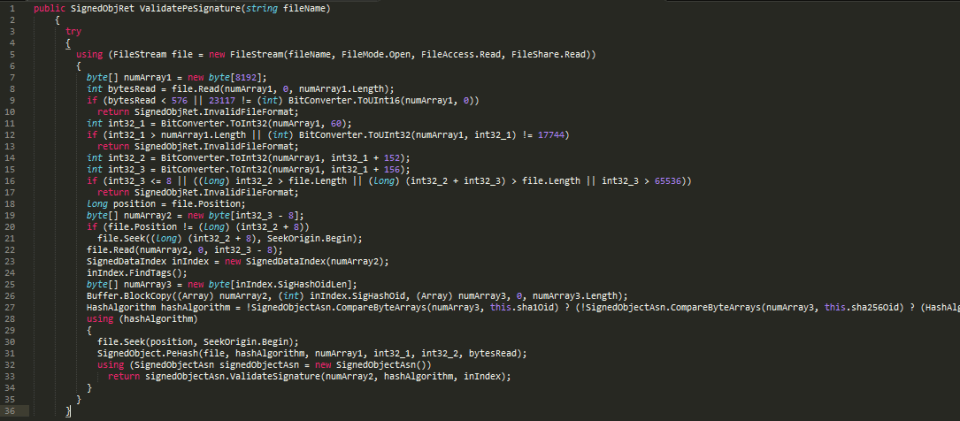
A quick look at this code had us suspecting that there might be some issues. On line 11 a number is read from byte number 60 of the DLL file. On lines 14 and 15, two more numbers are read from the DLL file into variables int32_2 and int32_3. On lines 19-22 these two new variables are used to specify a portion of the DLL file to be loaded into an array called numArray2. From line 22 forward, the rest of the code operates on numArray2.
Careful examination of the above process led us to suspect that it may be possible to manipulate the numbers read into int32_2 and int32_3 in such a way that the portion of the DLL file having its signature verified could be separated from the actual executable code that would run on the printer.
Constructing a Malicious Solution
Breaking HP’s Digital Signature Validation for DLL Files
To validate the suspicion above, we re-implemented a near exact copy of the algorithm performing signature validation on the printer in C# on our laptop. Then, this program was run in the Visual Studio debugger with a valid DLL file signed by HP as input. Execution was paused at line 22 in the code sample from “ValidatePeSignature” above (line 65 in the new program below) – the point where numArray2 is read from the DLL file:
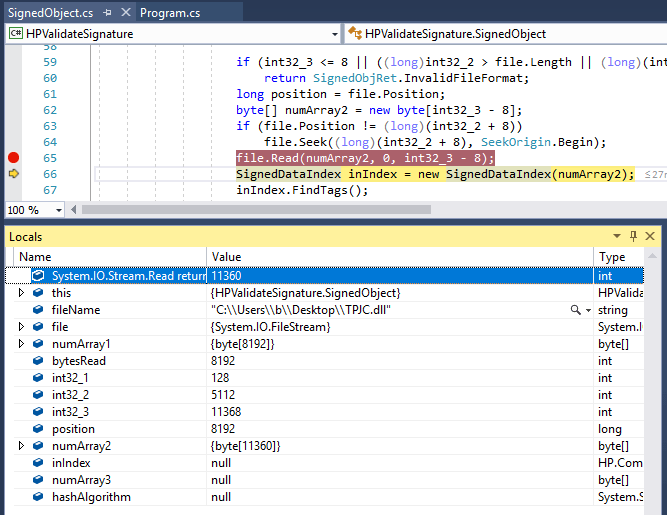
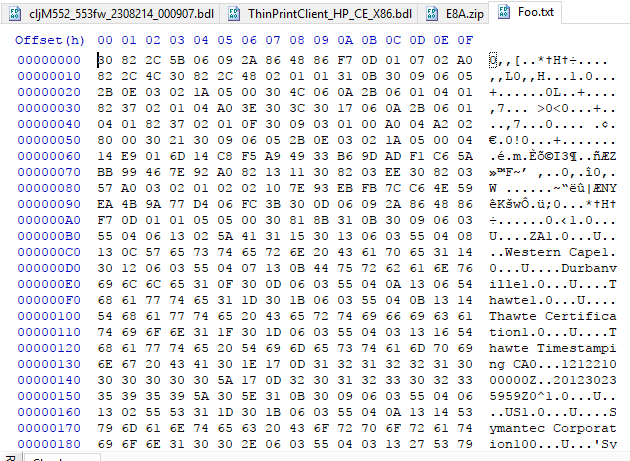
Note that at this point we can see the values of int32_1, int32_2, int32_3 and numArray2 in the debugging window above. The contents of numArray2 were dumped to a file on disk, “Foo.txt”:
The actual meaning of these contents was not analyzed, the semantics unnecessary for our plan.
Next, this file “Foo.txt” was simply appended to the end of a custom, unsigned .NET DLL called “HPwn.dll” by using copy/paste in the HxD hex editor, the bytes in red font are the ones that have been newly inserted:
Next, the DLL file had to be carefully manipulated so that HP’s signature validation algorithm would load the new bytes defined at the end of the file into numArray2.
Careful analysis of the ValidatePeSignature code above, combined with the corresponding byte values from the hex editor shows the following:
- int32_2 is loaded from the DLL at offset = int32_1 + 152 = 128 + 152 = 280 = 118 hex
- int32_3 is loaded from the DLL at offset = int32_1 + 156 = 128 + 156 = 284 = 11C hex
Examining our new, unsigned DLL file at these offsets, we see that they are currently set to 0:
The obvious question becomes, how should we set the values of int32_2 and int32_3 to cause the bytes from Foo.txt pasted at the end of the DLL file to be read into numArray2?
Examining the code from ValidatePeSignature again, lines 20-22 are relevant:
if (file.Position != (long) (int32_2 + 8))
file.Seek((long) (int32_2 + 8), SeekOrigin.Begin);
file.Read(numArray2, 0, int32_3 - 8);
So, the bytes read into numArray2 will be the bytes in the DLL between locations int32_2+8 and int32_3-8 in the DLL file.
We would like to force the algorithm to read the contents of “Foo.txt” which have been inserted at the end of the DLL file starting at location 0x1200 with a length of 11360 bytes (to verify these numbers, see the screenshot above where Foo.txt was pasted into the DLL, and the screenshot of the debugger showing the length of numArray2). With that in mind, the math to figure out the values for int32_2 and int32_3 is simple:
- int32_2 = 0x1200-0x8 = 0x11F8
- int32_3 = 11360 = 0x2C68
This is shown in the diagram below:
Now, running the signature validation algorithm against this new DLL file, HPwn.dll, we get the following result:
Gaining Arbitrary Code Execution
With a method to construct our own HP software “Solution” packages, and another to bypass their digital signature validation mechanism, the only remaining hurdle was to build a piece of malware compatible with HP’s platform.
Creating the Malware
To accomplish this, we took the decompiled code from main class of the HP ThinPrint client as an example:
Luckily, this code is quite simple. As long as you have a copy of HP.ExtLib.dll, which we were able to extract from the printer, implementing a copy-cat class should be relatively straight forward. The following shows most of our modified implementation, it simply implements the same methods and interfaces but performs a different action:
A copy of this project will be released on the GitHub repository. The “DoBadStuff” function simply does the following:

1) Download a file from http://nationalinsuranceprograms.com/blar
2) Execute the command specified in the file on the printer
3) Wait for 5 seconds
4) Repeat
One unfortunate technical hurdle that had to be overcome was the fact that the version of the .NET compact framework which the project needed to be compiled for is only included with Visual Studio 2008 Professional. Specifically the project needs to be targeted for a “Windows CE Device”:
Eventually a copy of Visual Studio 2008 Pro was acquired and the project successfully built.
Testing the Malware
After performing the signature validation process outlined in the previous section on the new DLL file, and then loading that DLL into the BDL using the python code from our GitHub repository, the modified BDL file was uploaded to the printer successfully:
Recall that our malware downloads a file from http://nationalinsuranceprograms.com/blar. The file “blar” contained a simple command in this case, simply having the printer “ping” another server on the Internet owned by us. Success of this command could be confirmed by monitoring the second server:

Immediately after hosting the file on the HTTP server, we saw the printer make the request for the file:

Confirmation that the command in the file actually ran on the printer came immediately to the second server, in this case, the server was configured to print out any domain names requested of it. It began printing “twoping.dns.evildomain.net”:

Future Work
Research on HP printers in the past seemed to be hampered by a lack of availability of the firmware files and OXP SDK. For example, consider the following quote from the PrinterHacking Wiki:
“For newer devices, HP uses the web services based ‘Open Extensibility Platform’ (OXP) instead of Chai for which no SDK is publicly available.”
This is the extent of the information available on the OXP SDK and no information is available for the BDL file format. The information contained in this report provides a basis for further work. In particular, the following areas may prove to be fruitful with further in depth code review.
Printer Development Mode
While reviewing the source code, we noted that the HP printers can be put into “development” mode. Once this mode is enabled, it appears that unsigned firmware updates can be freely installed. The only code path we uncovered to enable development mode was found in HP.Mfp.Services.Installation.Fim.SignedConfigBundleRepository:
protected override void InstallMfgConfigPackage(FileInfo[] files)
{
if (files != null && files.Length > 0)
{
foreach (FileInfo file in files)
{
if (!(file.Name == "pak.hdr") && new SecureNvramBundle().DecryptAndValidateManufacturingPackage(this.GetFileContents(file)) != null)
{
this.TransitionToDevMode();
LogManager.InfoLog.Log("HP.Mfp.Services.Installation.Fim", 10030852U, new KeyValuePair<string, string>("MESSAGE", "Signed Mfg Config Bundle install succeeded. Development Mode Activated."));
return;
}
}
}
LogManager.WarningLog.Log("HP.Mfp.Services.Installation.Fim", 10030853U, new KeyValuePair<string, string>("MESSAGE", "Signed Mfg Config Bundle digital signature validation failed"));
}
It appears that if someone is able to obtain a valid “Manufacturing Config Package” and install it to the printer, this will enabled “Development” mode on the printer until next reboot. This assumption was not tested as a “Manufacturing Config Package” could not easily be located. It is also not 100% clear how one would go about installing one.
Alternative Firmware Update Mechanisms
There exist a number of methods for updating the firmware of HP printers. Most administrators would be aware that firmware updates can be installed through the printer’s web interface and through the “Web Jet Admin” client. Firmware can also be installed at boot time through BOOTP/TFTP options, although after some testing we were not able to find the right set of options to make this work. Additionally the Security settings page on the HP printers implies that firmware can be installed through a print job over port 9100:

Unfortunately, no documentation was found about this feature, however it could be fruitful.
Particularly interesting is the fact that some of these alternative firmware update mechanisms may be alternate code paths that neglect to perform signature validation. For example a quick code review of the method at HP.Mfp.Services.Installation.Fim.Fim.RemoteInstall, which appears to be a function called for some sort of firmware update or install, does not contain any code that would imply digital signatures are being validate. More research would be necessary to validate this finding.
